Note: Open the required port on which server where ORDS install from firewall team.
Step 1: First of all install all required
RPM’s and then disable the selinux & iptables services in Oracle Linux.
You can
check the SELinux status with the following command:
|
1 2 3 4 5 6 7 8 9 10 |
[root@erpclnapx ~]#
sestatus SELinux
status:
enabled SELinuxfs
mount:
/sys/fs/selinux SELinux root
directory: /etc/selinux Loaded policy
name:
targeted Current mode:
enforcing Mode from config
file: enforcing Policy MLS
status:
enabled Policy deny_unknown
status: allowed Max kernel policy
version: 28 |
To disable SELinux you have to change the
“SELINUX=enforcing” to “SELINUX=disabled” in the /etc/sysconfig/selinux
configuration file:
|
1 2 3 4 5 6 7 8 9 10 11 |
# This file controls the state of SELinux on
the system. # SELINUX= can take one of these three
values: # enforcing - SELinux security policy
is enforced. # permissive - SELinux prints warnings
instead of enforcing. # disabled - No SELinux policy is
loaded. SELINUX=disabled # SELINUXTYPE= can take one of these two
values: # targeted - Targeted processes are
protected, # minimum - Modification of targeted
policy. Only selected processes are protected. # mls - Multi Level Security
protection. SELINUXTYPE=targeted |
Then reboot the server to take effect and
check the SELinux status once again just to make sure:
|
1 2 |
[root@erpclnapx ~]# sestatus SELinux
status:
disabled |
Disable the Firewall for Oracle Linux.
1.
Stop
the ipchains service.
# service ipchains stop
2.
Stop
the iptables service.
# service iptables stop
3.
Stop
the ipchains service from starting when you restart the server.
# chkconfig ipchains off
4.
Stop
the iptables service from starting when you restart the server.
# chkconfig iptables off
Step 2: Put
the hostname in host file.
[root@erpclnapx ~]# vi /etc/hosts
#127.0.0.1 localhost
localhost.localdomain localhost4 localhost4.localdomain4
#::1 localhost
localhost.localdomain localhost6 localhost6.localdomain6
127.0.0.1
localhost.localdomain localhost
10.24.248.38 erpclnapx.nicsi.in erpclnapx
10.24.248.40 erpclonedb.nicsi.in erpclonedb
Then reboot the server to take effect and
check the hostname once again just to make sure:
[root@erpclnapx ~]# hostname
erpclnapx.nicsi.in
Step 3: Create the user and groups.
[root@erpclnapx ~]# useradd -u 501 applmgr
[root@erpclnapx ~]# groupadd -g 500 dba
[root@erpclnapx ~]# usermod -g dba applmgr
[root@erpclnapx ~]# id applmgr
uid=501(applmgr) gid=500(dba) groups=500(dba)
Step 4: Change the required ownership and permissions on
directory.
[root@erpclnapx ~]# chown -R applmgr:dba /erp_ords
[root@erpclnapx ~]# chmod -R 775 /erp_ords
Step 5: Login with new user created applmgr.
Make the Required directory.
[applmgr@erpclnapx ~]$ mkdir
-p /erp_ords/ords
[applmgr@erpclnapx ~]$ mkdir
-p /erp_ords/ords/conf
[applmgr@erpclnapx ~]$ mkdir
-p /erp_ords/ords/conf/ords/standalone/doc_root
Step 6: Download the ORDS Software and then unzip.
[applmgr@erpclnapx ~]$unzip ords-19.1.0.092.1545.zip -d
/erp_ords/ords
Note: If ORDS and DB on
Same node then no need below steps otherwise do the below steps before
installation starting of ORDS.
While connecting to remote database with sysdba privilege, we
might encounter below error:-
[oracle@erpclonedb ~]$
sqlplus / as sysdba
SQL> alter user sys identified by oracle1;
Login on Remote Server
[applmgr@erpclnapx ~]$
sqlplus sys/oracle1@clone as sysdba
SQL*Plus: Release 11.2.0.3.0 Production on Sat Jul 30 18:33:40 2016
Copyright (c) 1982, 2011, Oracle. All rights reserved.
ERROR:
ORA-01017: invalid username/password; logon denied
Enter user-name:
This is because, the
password file might have a different password.
If sys
user's password and "password file's" password is same, we can
connect as sysdba privilege locally as well as remotely.
Created new password
file:-
[oracle@ erpclonedb dbs]$orapwd
file=orapwCLONE password=oracle1 entries=5 force=y
However, if
"password file" is created using separate password, we need to know
it in order to login remotely with sysdba privilege using sys user, or else,
will encounter ORA - 01017.
By the way, this is not
the same with other users. SYS is just special!!!
Now, if we alter SYS
user's password, it will sync up with "password file".
[oracle@erpclonedb ~]$
sqlplus / as sysdba
SQL> alter user sys identified by oracle1;
Step 7: Install The ORDS.
[applmgr@erpclnapx ~]$cd /erp_ords/ords
[applmgr@erpclnapx ords]$java -jar ords.war install advanced
For More Info: https://blog.yannickjaquier.com/oracle/oracle-rest-data-services-ords.html
Step 8: Runs a Command that Keeps Running a process after You
Log Out.
[applmgr@erpclnapx ~]$nohup java -jar ords.war standalone >
startApex_21Jan20.log &
After Clone
on Clone Server: doing this activity on where ORDS Install
[applmgr@erpclnapx ~]$ cd /erp_ords/ords
[applmgr@erpclnapx ords]$ java -jar ords.war install advanced
Verify ORDS schema in Database Configuration apex with
connection host: erpclonedb.nicsi.in port: 1536 sid: CLONE
Requires to login with administrator privileges to verify Oracle
REST Data Services schema.
Enter the administrator username:SYS AS SYSDBA
Enter the database password for SYS AS SYSDBA:
Confirm password:
Retrieving information.
Enter the default tablespace for ORDS_METADATA [APEX_SPACE]:
Enter the temporary tablespace for ORDS_METADATA [TEMP]:
Enter the default tablespace for ORDS_PUBLIC_USER [APEX_SPACE]:
Enter the temporary tablespace for ORDS_PUBLIC_USER [TEMP]:
Installing Oracle REST Data Services version 19.1.0.r0921545
... Log file written to
/home/applmgr/ords_install_core_2020-03-06_115545_00676.log
... Verified database prerequisites
... Created Oracle REST Data Services proxy user
... Created Oracle REST Data Services schema
... Granted privileges to Oracle REST Data Services
... Created Oracle REST Data Services database objects
... Log file written to /home/applmgr/ords_install_datamodel_2020-03-06_115601_00890.log
... Log file written to
/home/applmgr/ords_install_apex_2020-03-06_115602_00993.log
Completed installation for Oracle REST Data Services version
19.1.0.r0921545. Elapsed time: 00:00:18.452
Enter 1 if you wish to start in standalone mode or 2 to exit
[1]:2
[applmgr@erpclnapx ords]$

![[putty-configure-x11-forwarding-on-windows-01%5B2%5D]](https://blogger.googleusercontent.com/img/b/R29vZ2xl/AVvXsEitB_-ImHVt9YTk1F-fdEJ1XG6QQYQBGFIBbKhWQnfwb_78b3QCizUhGA5BKr-vPv6-LvCMuXhkKqGqkitqpRkQTBJBsBosFFjRQsPyoHaExLp1L5z8iLUFfM3qa8SjULiWKRnlpvOqmiw/s1600/putty-configure-x11-forwarding-on-windows-01%255B2%255D)
![[putty-configure-x11-forwarding-on-windows-02%5B2%5D]](https://blogger.googleusercontent.com/img/b/R29vZ2xl/AVvXsEjmbaklaTuCX8O2T0P-MPGA4n5p7nio5etmIOWHyjbMhDRAEF6DwN5dJqGoeaGg6Yapppryx967IIsN07ZstH_PJk89KpNv0jNK3Dwl9hiUyDIeBcceRliZNujAth72IMS0-wiqulnu_J8/s1600/putty-configure-x11-forwarding-on-windows-02%255B2%255D)
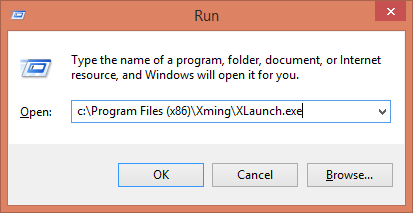
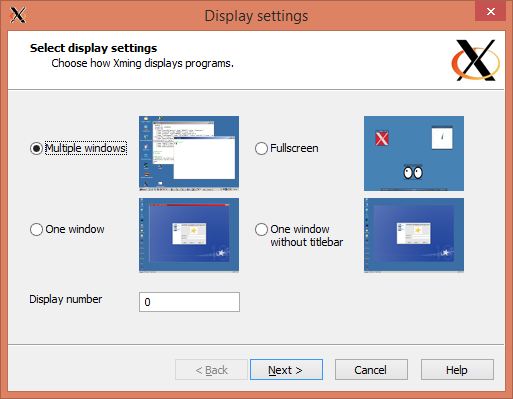
![[putty-configure-x11-forwarding-on-windows-03%5B2%5D]](https://blogger.googleusercontent.com/img/b/R29vZ2xl/AVvXsEjXgg4Q9tkfhbKpv-eflH522v6if31mFR_iuorjOWvxk1ciy7LMhGXdDV7mCsk-myTVzSZ8TV2D_JsQ2DvXyZk3asE9gPBSDS2kKK9K8AjEi7T57o_q0BVFT0cJTqY7eCB8PNHBHDaNInM/s1600/putty-configure-x11-forwarding-on-windows-03%255B2%255D)

![[putty-configure-x11-forwarding-on-windows-04%5B2%5D]](https://blogger.googleusercontent.com/img/b/R29vZ2xl/AVvXsEjgzYYbeZmE-7JRIPD0BjM7BMGLox-phvoB9gSUE-nUrzGUAitsTird_ufnxSLEUwuXkiiufe8spwFzntW5l6dSWBIUnfl3cces6knwOKXKkeOSOHdQAIOQrjrJppIHOXTmtNvUqueGLjI/s1600/putty-configure-x11-forwarding-on-windows-04%255B2%255D)
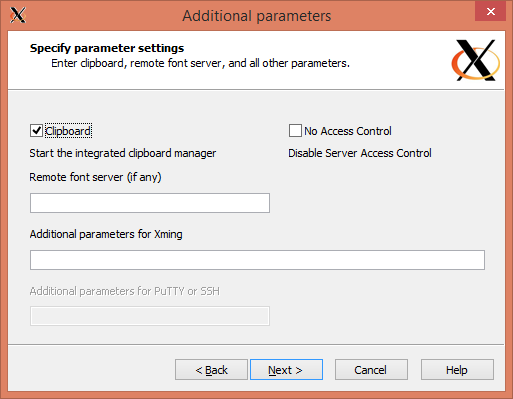
![[putty-configure-x11-forwarding-on-windows-05%5B2%5D]](https://blogger.googleusercontent.com/img/b/R29vZ2xl/AVvXsEiF7HIx6T2XAcL84JidFx-as1QpXxXlGvN6kaaZ2NzsU5yYN1jyZi1xhVzZ2Lz4BJ78F7TWKYnBsd6MFQyBHZrh0aREMvYDolwEUOOFv6s0WhVmDQV_ZFtRLGYZQmycC3yklrR5Ir8diNA/s1600/putty-configure-x11-forwarding-on-windows-05%255B2%255D)
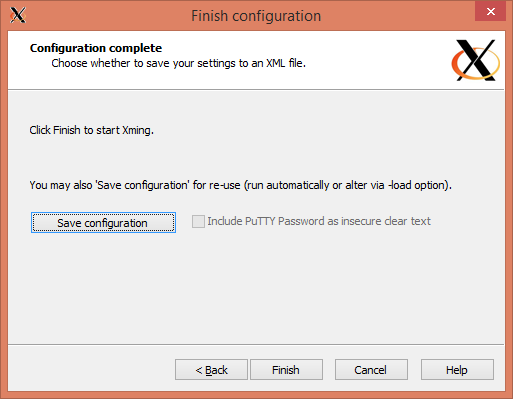
![[putty-configure-x11-forwarding-on-windows-06%5B2%5D]](https://blogger.googleusercontent.com/img/b/R29vZ2xl/AVvXsEgAsncSahnlw0_Q958db821bhR_D7o3tyEUqbCW-faV1DyHeAUzLt0bPSpYEzvX6zzwXih0se2fm9sPCoiefSw4WObRvnLirpO0VcDXCHICberlHZV-fmAfYVA3Xi384ttdY-6zv8yZMFs/s1600/putty-configure-x11-forwarding-on-windows-06%255B2%255D)

![[putty-configure-x11-forwarding-on-windows-08%5B2%5D]](https://blogger.googleusercontent.com/img/b/R29vZ2xl/AVvXsEhGqDjNvTTmzC_Fqvybb06yAHIxTecTwuHieLricStFQGTf7Vh9aJaZfn_dkg-Dmvec9BilLh-etBDzIq_7gexUefiHXZZ_TSCGYyZQZZoJPXX9ocTUIjYB9uy8QL9AbkeXkFByvVjc0Pw/s1600/putty-configure-x11-forwarding-on-windows-08%255B2%255D)

![[putty-configure-x11-forwarding-on-windows-09%5B2%5D]](https://blogger.googleusercontent.com/img/b/R29vZ2xl/AVvXsEiLL1WDKqbI8_CxFOd7ZrsPq_hD0eC6p7Jp67i8IdolFBhBTRmfPvVpUBAqWj_QZwLq5oO3tEb63nKkO3x1IYhfimWzpFpIAmsv-Whlf_FT4gWFXfVsvlJFmkKtzwpHtdpq6GA4_uQmmKY/s1600/putty-configure-x11-forwarding-on-windows-09%255B2%255D)
