Recently while we have working on XML Publisher came across a requirement from the client. The requirement was to have a specific font for the PDF Report Output i.e. print Barcode on PDF Format.
We need first to download & Install the required custom Font file from the Internet; this file is not free and need a license to possess it. But we can surely go with the trial one to start with.
Once you have download & Install the Font File, all installed font goes to “C:\Windows\Fonts” directory after that we start the setup you can use standard font path or use optional path for the .ttf file. We have placed the .ttf file under the custom path i.e. “C:\idautomationhc39m”.
The next step would be to configure and so the “xdo.cfg” should be updated to map to the new font as below Generally the .cfg file is found in the path “C:\Program Files (x86)\Oracle\BI Publisher\BI Publisher Desktop\Template Builder for Word\config”. in my case:
Initially xdo.cfg doesn’t exist. Well it does, it’s just called xdo_example.cfg and you can easily rename it to xdo.cfg. Open it up with your editor of choice and this line at the bottom:
<font family="IDAutomationHC39M"
style="normal" weight="normal">
<truetype path="C:\idautomationhc39m\IDAutomationHC39M.ttf"
/>
</font>
The “family” is the same as “Base Font” and the “path” is the directory where you have your font file (.ttf) located.
Note: For the exact File Name of .ttf file, Right click the font file and go to properties. Copy the .ttf file name Font family is the name that you see in Word under Fonts
This would complete the local setups and now if you have a RTF file just load the .xml file and have the tag mapped to the desired font and run, you would be able to see the desired font output if you run it as PDF.
Moving to the setups required for setting the Fonts in the Oracle Application.
Navigate to the XML Publisher Administrator Responsibility è Administration

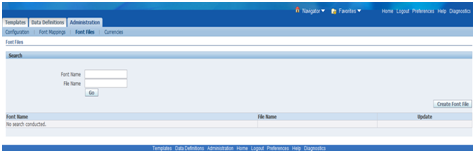
Move to Font Files Tab and Click on Create Font File
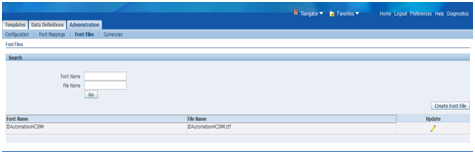
Give a desired Font Name say “IDAutomationHC39M” and map the IDAutomationHC39M.ttf file from your local system. The font file would be uploaded and saved to the server.
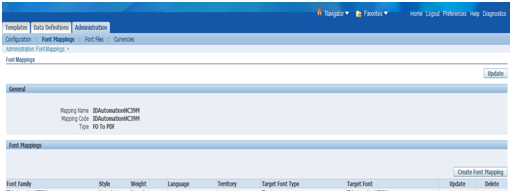
Next we need to create the Font Mapping, Move to Font Mappings Tab and Click on Create Font Mapping Set

Feed the details for the Mapping Name, Mapping Code and Type as FO To PDF and click on APPLY

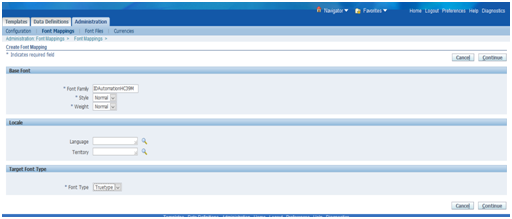
Now click on Create Font Mapping
Feed in the details for Font Family as IDAutomationHC39M the name that you see in Word under Fonts, Style and Weight would be Normal and Font Type would be TrueType then click on CONTINUE
Next map the Font Mapping with the Font File that was created in the above step and click on APPLY.

Here is the final screen, now the Font File is mapped with the Font Mapping.

Next and the final step would to configure it, move to the Configuration Tab

Under FO Processing map the Font Mapping Set created in the above step and SAVE.

This completes the setting up the new Font with the XML Publisher.
Now when we run our RTF file from the Application the output would be as desired say as below, my requirement was to have the same is shown as below.
This completed the complete information on setting up the desired font for our custom XML Publisher Report an RTF File.
Thanks You!!!
No comments:
Post a Comment